Showing posts with label SPP. Show all posts

Thursday, April 25, 2024

Why Does Raytac AT-Command Module Not Require An End Code Mechanism?

Developers may be familiar with using ‘\n’ (hex 0x0A) or ‘\r’ (hex 0x0D) as end codes to determine the end of a data packet when writing programs. In the original Nordic SDK example code, ble_app_uart, is to consider the reception of 244 bytes or the presence of ‘\n’ (hex 0x0A) or ‘\r’ (hex 0x0D) as end code as the end of a data packet. The program then sends this received data via BLE to APP.


Developers encountering Raytac AT-Command module for the first time may find it very unfamiliar and be puzzled by the absence of 0x0A or 0x0D end code. You may raise questions about how to receive complete information without relying on these end code? Therefore, we’ll provide explanations for common use cases of AT-Command in both connected and disconnected scenarios:


In the connected condition –
Raytac’s AT-Command module operates in Pass-Through mode. For instance, when the APP sends 0x41 0x42 0x43 (3 bytes) through the module to the MCU, the MCU will receive only 0x41 0x42 0x43 (3 bytes). When APP sends these 3 bytes, there is no need to include the 0x0D end code or 0x0A end code at the end. The same approach applies when the direction of transmission is reversed (i.e., when the MCU sends to the module and then to the APP).

Here, it’s crucial to note that there is a specific consideration for the “Data Interval” (DI) setting between transmitting one data packet and the next. Failure to configure the DI appropriately may result in packet loss and lead to Bluetooth disconnection shortly after data transmission. The recommended DI values vary at different Baud rates, and you can refer to the AT-Command specification for suggested DI values.
As an example, consider Raytac AT-Command module in the scenario of “Mobile App -> Module (MDBT42V-AT) -> MCU,” with a Baud rate of 9600, no flow control, and a data length of 244 bytes. In this case, the DI value for transmitting data must be at least 250ms to prevent packet loss.


In the unconnected condition –
Providing explanations to the Bluetooth module by sending AT commands from the MCU (or Console) is illustrated below. There is no need for 0D or 0A end codes at the end.
AT?NAME
AT+NAMESQ-BT
AT?NAME


Edited by Sales Manager: Ms. Vicky Huang


Raytac Corporation 勁達國際電子股份有限公司  A company of Abietec
Bluetooth & WiFi module maker based on Nordic nRF54, nRF53, nRF52, nRF7002 solution
BT5.4 &BT5.3 & BT5.2 & BT5.1 Qualified, FCC/IC/CE/Telec/KC/RCM/SRRC/NCC Pre-Certified. Bluetooth Solution: nRF54, nRF5340, nRF52840, nRF52833, nRF52832, nRF52820, nRF52811, nRF52810, nRF52805, nRF51822 WiFi Solution: nRF7002
http://www.raytac.com
email:service@raytac.com
Tel: +886.2.3234.020

Friday, June 4, 2021

MDBT42T & MDBT42TV Joined Raytac AT Command Codeless Module Family

Headache about how to make your device going wirelessly? Want to have Bluetooth connectivity implement but worried about there is no resource to support firmware code developing ? Raytac AT command modules is the best ideal solution to enable the project having a breakthrough achievement quickly without writing a line of code or building up a design of RF hardware.


AT command stands for Attention Command, which is the most ordinary, easy and widely applied protocol to connect and bridge between IoT devices. Learning from Bluetooth Classic Serial Port Profile (aka SPP) experience, Raytac has been using UART service (ask NUS, Nordic UART service) since 2016 to assist customers proceed the Bluetooth project development. With full experience accumulated from projects, Raytac released the fist AT command module in 2018. Until now, Raytac AT command modules have been widely applying in different applications and successfully easier the project development and shorten the schedule.

Raytac keep improving to meet your demand now and future. When IoT device goes smaller become a trend of fashion, Raytac headed for it. Today, Raytac is happy to announce there are 2 new AT command modules released which are MDBT42T & MDBT42TV, which will have 2 kinds of antenna option available for each model. The modules are smaller than ever which benefit for the applications with space constraints design, also an optimized hardware module design to enable the module not only small but low cost. Raytac keep striving to make it better.

MDBT42T Series - AT Command Module & Development Kit Demo Board

MDBT42T-PAT (PCB Antenna AT Command Module)

MDBT42T-AT (Chip Antenna AT Command Module)

MDBT42T-AT-UART-S (AT Command Module DK Development Kit )

MDBT42TV Series -AT Command Module

MDBT42TV-PAT (PCB Antenna AT Command Module)

MDBT42TV-AT (Chip Antenna AT Command Module)


Raytac Corporation 勁達國際電子有限公司
A BT5.2 & BT5.1 & BT5 module maker based on Nordic nRF52 & nRF51 solution 
(nRF5340 & nRF52840 & nRF52833 & nRF52832 & nRF52820 & nRF52811 & nRF52810 & nRF52805 & nRF51822)
www.raytac.com. email: cs@raytac.com. Tel: +886.2.3234.0208


Friday, April 26, 2019

Raytac's UART Service (AT Command Central / Master) -MDBT50Q-RX-ATM How do you get started?

Easy! At least when you know what to do

Many of our customers just want a device that provides Bluetooth technology to their product or solution that they've developed. However, utilizing the full capacity of the Bluetooth protocol is not always easy and sometimes not even necessary. For these customers, choosing Raytac's modules/dongles loaded with AT Command, such as MDBT50Q-RX-ATM, is the best choice.
But even a product such as MDBT50Q-RX-ATM that is supposed to make it easy for customers to wirelessly transfer data from one device to the next can be difficult to use - especially when you don't know HOW.

So, I thought we'd take this in two simple steps.

  1. Device Name
To be really sure that you can connect to the device thus making you able to pair with it, you will have to make sure that the device name setting in the AT Command list is set to the name that the other (slave) device is set to.
For example, if your slave device set to have the name "ILoveBluetooth" and you haven't changed the settings in the AT Command, you will not be able to pair your MDBT50Q-RX-ATM with this device.
As you can see in the picture below, the default setting for this device's name is "Raytac AT-UART".


When editing this name, you get a smaller window like this popping up:


Make sure that the name set on your device that you wish to connect with the dongle AND this name in the AT-Command device's list are the same. You will in this case need to change this to "ILoveBluetooth".
  1. RSSI
This is a trickier part - especially when you don't know what it is.
RSSI stands for Received Signal Strength Indicator and, just like the name implies, is a value of strength of which the incoming signal has to be in order to even be considered by the scanning device.
In other words, the lower the value is set to, the weaker signals the scanning device will show.
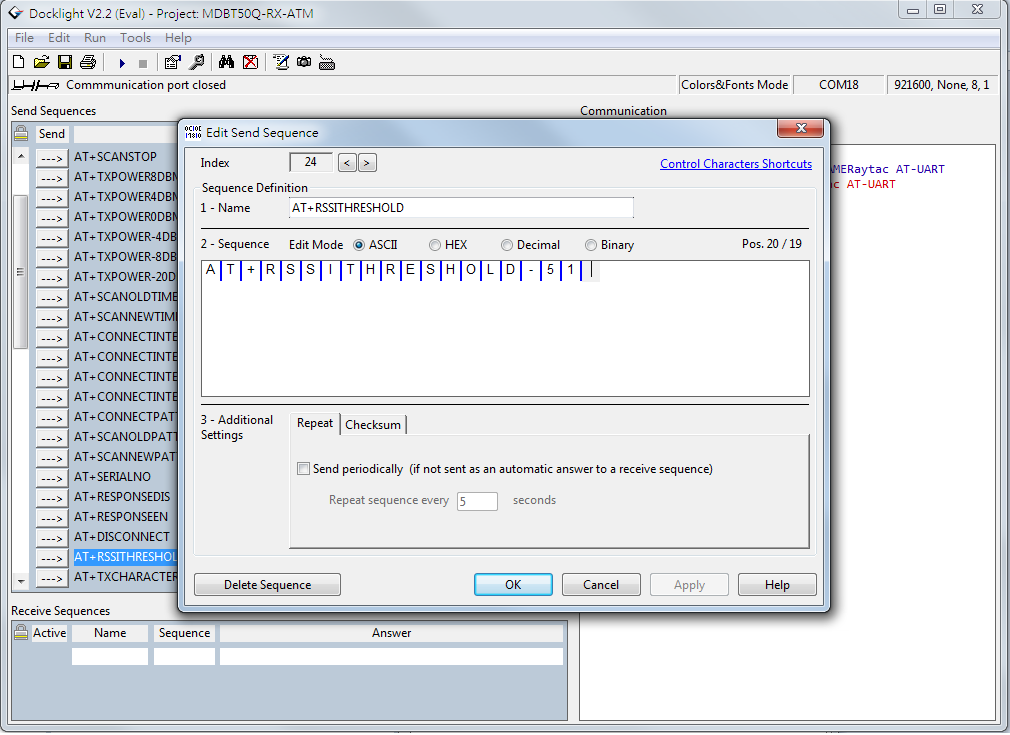
The standard value of Raytac's AT-Command modules/dongle is -51 and the setting screen looks like this:


  1. Slave device's SDK
What many new customers seem to believe is that if you use our AT-Command modules/dongles, you won't need to do anything - they will just magically communicate with each other somehow.
I hate to break it to you, but no... that's not how it works. You will have to at least make sure that the two devices "speak the same language". As for our AT-Command modules/dongles, or in this case MDBT50Q-RX-ATM, it is through a "language" (a.k.a. protocol) called UART.
First of all, "UART" is not "U-ART" although it's kind of pronounced that way, but it's an abbreviation that stands for Universal Asynchronous Receiver/Transmitter. You can read about it here.
I will spare you all the details about the UART protocol itself, but one thing that we will need to make sure of is that you have it installed onto your slave device.

Hopefully, you've downloaded Nordic's latest SDK and you have it ready on your computer. You can download them directly HERE.
Note: This file is quite big (~130MB), so DO NOT click on the last link if you don't want to download this on your current device.

Inside this file, you will find a lot of stuff. However, for this particular case, we only really need to care about the "examples" folder.


In this folder, we will have (surprise surprise!) even more folders :D
As per usual, we don't have to check them all out. In this case, we specifically only want to check the "ble_peripheral" and the "peripheral" folders.


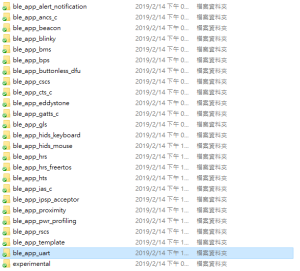
Go into the former folder and you'll find see the following folders in which you will want to enter the "ble_app_uart" folder.:


In this folder, you will see five more folders and two files, but we only want to check out one of them depending on which chip type you're using in your slave device. Let's say you're using a nRF52832 chip (or module such as MDBT42Q-P512KV2), then you'd want to enter the first folder called pca10040. Check the picture below to see which folder you'd want to enter:


Assuming you entered the folder that I mentioned above, you will then want to enter the "s132" folder.


Once you're in here, I am pretty sure you developers out there know what to pick :)

In the beginning of this section, however, I also mentioned another folder called "peripheral" which we will guide you through now - even if it's very similar to what we just did.

As you can see, there are a TON of folders in here, but we will cherry-pick our folders here too.
Let's say that you'd like to be able to make your slave device to read and transmit information from a sensor. Supposedly, most sensors use either the I2C or the SPI interface. In each respective folder, you will find the same folder layout as in the previous picture - folders representing what chip/module you have.
The main point of showing you this is simply because from these two folders, you can snatch the small amount of code that you need to edit the main code of your UART main-code so that you can both read and send the data from the sensor you might have.

Hopefully, you've now started to realize how these things come together and we can finally start to connect these devices. This takes us to the next step:

  1. ATSCANNEW
Once that's done, you will need to use your AT-Command module/dongle (here MDBT50Q-RX-ATM) to scan for the slave device that you want to pair. To do this, you first have to make sure your slave device is broadcasting, then execute a command called ATSCANNEW.
Once you've done so, your MDBT50Q-RX-ATM's blue LED will hopefully go from fast blinking to a slower blinking. This means that your two devices, master and slave, have now paired successfully. Wohoo! :)

We hope that this makes our AT-Command modules/dongles even easier to use!
Raytac wishes you all happy tinkering :)

Raytac Corporation 勁達國際電子有限公司 A BT 5.1 & BT 5 & BT 4.2 module maker based on Nordic nRF51 & nRF52 solution (nRF52840 & nRF52832 & nRF52811 & nRF52810 & nRF51822)
www.raytac.com email: cs@raytac.com Tel: +886.2.3234.0208

Sunday, March 31, 2019

nRF52840 AT Command USB Dongle MDBT50Q-RX-ATM

To have an easy understanding of Raytac's AT Command USB Dongle, here provides the command table for reader's easy reference.

We encourage readers to visit Raytac's website to obtain the detail information
MDBT50Q-RX-ATM (Click Me)


Thursday, March 28, 2019

Raytac Central Role AT Command USB Dongle MDBT50Q-RX-ATM Released

Raytac welcomes another product to its AT Command family

Part No.:
MDBT50Q-RX-ATM


Raytac developed AT Command  (Master / Central ) solution based on Nordic's nRF52840, thus fulfilled the demand of the USB interface and our mission to deliver a full coverage of our AT Command product line.
Raytac’s nRF52840 USB AT Command dongle, MDBT50Q-RX-ATM, is a BT5, FCC/IC/CE/Telec/KC/SRRC/NCC/RCM/WPC pre-certified dongle which eliminates the need for RF design expertise and significantly reduces the time to release your product to market for complex M2M IoT applications.
AT command modules is an easy solution that provides developers a quick breakthrough to Bluetooth connection. Without the need for firmware development, you simply have command settings on the MCU and can start to enjoy the implementation of bridging connectivity between devices through Bluetooth.

After we have completed both Central (Master) & Peripheral (Salve) role AT command module projects, the USB interface has brought up the strongest demand by developers.

Raytac Corporation 勁達國際電子有限公司
A BT5 & BT 4.2 & BTv4.1 module maker based on Nordic nRF51 & nRF52 solution
(nRF51822 & nRF52832 & nRF52810 & nRF52811 & nRF52840)
www.raytac.com email: cs@raytac.com Tel: +886.2.3234.0208

Monday, May 21, 2018

AT-Command Module Tutorial ~ About First Time Connect To The DK Demo Board

With strong demand for AT command module coming up from markets, here provides an easy introduction about hardware and software setup work for Raytac's AT command module demo board for quick start.

Wednesday, December 13, 2017

Nordic nRF52810 UART service (NUS) Solution (Raytac Module: MDBT42Q-192K)

Nordic released nRF52810 aimed to provide a low entry barrier for developers to explore Bluetooth Low Energy implements.To improve the effective cost, nRF52810 has provided a limited RAM (24K) and Flash Memory (192K) specification.
Among the BLE implements, Raytac is aware that the UART service (as known as NUS, Nordic UART service) is the most common and widely applied service which is used to called as SPP in classic Bluetooth.


Tuesday, February 7, 2017

Nordic nRF52832 UART Service Solution (Module: MDBT42Q)

Raytac Corporation
A BT4.1 & BT4.2 & BT5 module maker based on Nordic nRF51 & nRF52 solution 
(nRF51822 & nRF51422 & nRF52832 & nRF51802 & nRF52840)
www.raytac.com            Tel: +886.2.3234.0208
email: service@raytac.com

UART service, as known as NUS (Nordic UART Service) is the most common and easy way for BLE relating IoT Implement.

Customers who is familiar with Classic Bluetooth are used to call as SPP service.