Showing posts with label nRF7002. Show all posts

Wednesday, May 20, 2026

Raytac/abietec at COMPUTEX Taipei 2026 - Explore the Future of Nordic Bluetooth, Wi-Fi, and Edge AI Technologies


As COMPUTEX 2026 approaches, are you ready to witness the next breakthrough in wireless connectivity technology?

From June 2 to June 5, 2026, Raytac and abietec sincerely invite customers and partners worldwide to visit our exclusive booth at:
POPPOP Taipei (Taipei Bottle Cap Factory), Building F (Click here for Google Maps location)

Join us to explore the future of Bluetooth and Wi-Fi technologies, exchange ideas with our engineering team, and discover how next-generation wireless solutions can accelerate your product development.

Why Raytac/abietec?
We understand that having a powerful Nordic Semiconductor SoC is only the beginning of successful product development.
The real challenges often come afterward — including RF design optimization, antenna tuning, impedance matching, and complex global RF certifications.


At Raytac, we provide more than high-quality wireless modules; we help shorten your development cycle.
Industry-Leading Bluetooth® & WiFi Solutions
Built on Nordic Semiconductor’s advanced SoC platforms, Raytac modules deliver:
- Ultra-low power consumption
- Stable wireless performance

One-Stop Wireless Development Support
We understand the complexity behind RF engineering. Raytac’s solutions help reduce engineering effort in areas such as:
- Antenna design
- RF tuning & impedance matching
- Certification preparation
- Hardware integration

Allowing your engineering team to focus more on developing core product functionality.

A Truly Non-China Supply Chain
Raytac takes pride in maintaining a 100% non-China manufacturing background, offering greater supply chain transparency, flexibility, and competitiveness in international markets: an increasingly important advantage in today’s global environment.

Daily Tech Talks During the Event
Throughout the 4-day exhibition period, we will host daily Tech Talk sessions from 11:00 AM – 11:30 AM, covering:
- Nordic nRF54 and nRF70 series technologies
- Raytac's Low-power Wi-Fi + Bluetooth® solutions
- Real-world application examples from customers
- How Raytac's pre-certified modules help you shorten IoT development and reduce time-to-market

Whether you are looking for a reliable Bluetooth module, evaluating Wi-Fi solutions, or facing engineering challenges during product development, we welcome you to stop by and discuss your project with us — we may have ideas that help solve your challenges.

Reserve a Meeting with Us
Interested in scheduling an on-site discussion or learning more?
Please feel free to contact us directly on: https://www.raytac.com/contact/,
or reach out to our sales representative:
Mr. Welson Kuo
Email: welson@raytac.com

We look forward to seeing you in Nangang, Taipei.

Monday, February 2, 2026

Raytac Group Showcases Next-Generation Wireless Solutions at Embedded World 2026


New Taipei, Taiwan / Los Angeles, USA, 02/02/2026

Raytac Group, together with Raytac Corporation (USA) and abietec Inc., will exhibit at Embedded World 2026, taking place March 10–12, 2026, at the Nürnberg Convention Center, Germany.

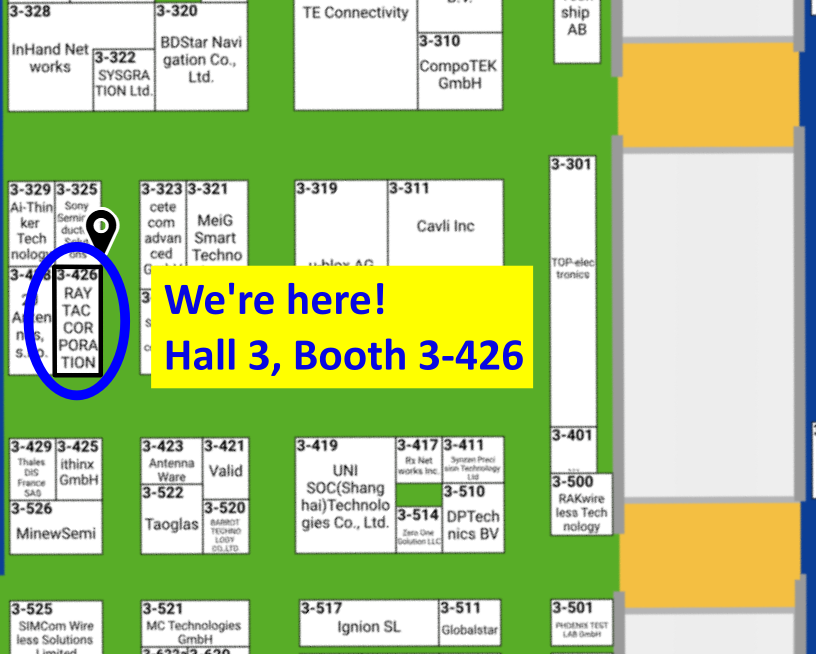
Visit us at Hall 3, Booth 3-426 to discover how Raytac is driving the future of wireless connectivity — from ultra-low-power Bluetooth® modules to advanced Wi-Fi and system-level solutions.

At the show, Raytac will showcase:

  • Announcement on our AN54LM series: NordicSemi nRF54LM20A modules and dongles that powers up the IoT market with lower power consumption and High speed USB. 
  • (Product link click me)
  • New Nordic nRF54L15 & 10 & 05 series modules: AN54LQ and AN54LV, built for Bluetooth 6.0 with ultra-low power, strong RF performance, coming up with 4 form factors and 7 antenna types
  • New Wi-Fi + BLE dongle based on the Nordic nRF7002 and nRF5340 solutions
  • live demos from our partners’ applications
  • Channel Sounding demo showcasing enhanced ranging accuracy and RF performance
  • How Raytac’s ecosystem and design partners help you accelerate product development.
abietec Inc. will showcase:

  • Bluetooth + Wi-Fi combo modules powered by Infineon CYW55912 chipset
  • Comprehensive OEM/ODM design services supporting a wide range of wireless applications.

Stop by our booth to see live demos, discuss your next project with our engineers, and learn how Raytac and abietec can help bring your wireless ideas to life.

We’re waiting for you at:
Embedded World 2026
📍 Nürnberg Convention Center, Germany
📅 March 10–12, 2026
📌 Hall 3, Booth 3-426


Let Raytac and abietec power your next innovation: from concept to connected reality!

Monday, December 22, 2025

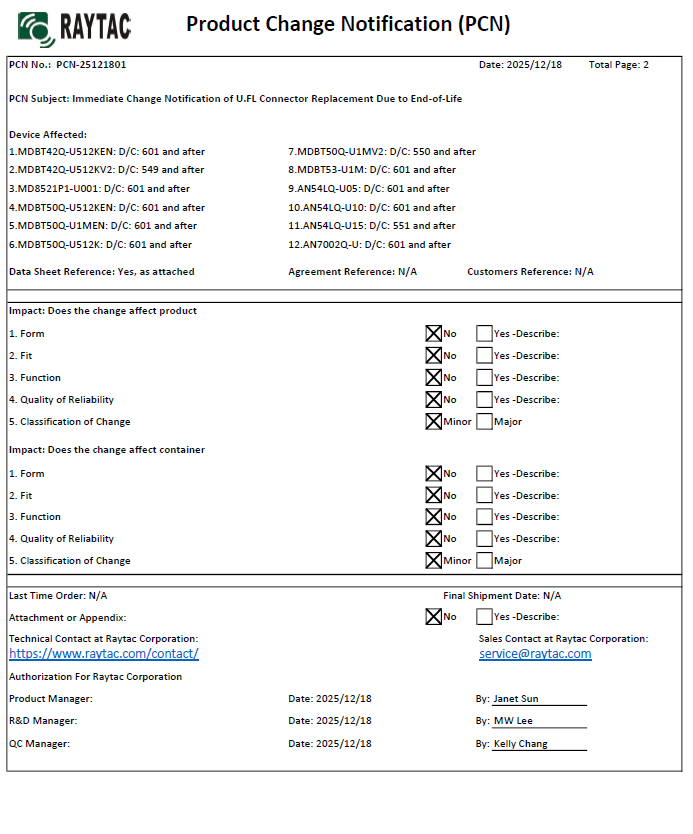
Immediate Raytac Product Change Notice (PCN-25121801) Announcement on u.FL Connector Replacement

Raytac would like to announce an immediate Product Change Notice (PCN-25121801) for below modules, change effective on the Date Codes stated within.


Device Affected:

1. MDBT42Q-U512KEN: 601 and after
2. MDBT42Q-U512KV2: 549 and after
3. MD8521P1-U001: 601 and after
4. MDBT50Q-U512KEN: 601 and after
5. MDBT50Q-U1MEN: 601 and after
6. MDBT50Q-U512K: 601 and after
7. MDBT50Q-U1MV2: 550 and after
8. MDBT53-U1M: 601 and after
9. AN54LQ-U05: 601 and after
10. AN54LQ-U10: 601 and after
11. AN54LQ-U15: 551 and after
12. AN7002Q-U: 601 and after
13. AN02U53U: 601 and after

There are no changes on Form, Fit, Function, and Quality of Reliability. Only change in u.FL Connector Appearance. All existing certifications and technical documentations remain valid.

We kindly invite our customers, distributors, and partners to update your records accordingly. For any questions or support regarding this update, feel free to reach out via: sales@raytac.com.


Saturday, November 22, 2025

16-Jan-2026 Update: How to set up Hardware & Software, Build & Compile Firmware, Validate DFU, and Wifi SCAN using Raytac’s Nordic nRF7002+nRF5340 WiFi+BLE Devkit-AN7002Q-DB-5340-M

Raytac has advanced the dev kit of bundle offer – WIFI+BLE:
AN7002Q-DB-5340-M with an on-board flash memory(MX25R64) to create easy evaluation for Wi-Fi project developments.

[January 2026 Update]
In this article, we will talk about:
Project WITH External Flash MX25R64(8MB) applied
- Connecting through SPI between nRF5340 module: MDBT53-1M(BLE) & nRF7002 module: AN7002Q(WIFI)
- Connecting through QSPI (XIP) between MDBT53-1M and external memory MX25R64

Table of Content———————————————————————————————

  1. Hardware Set Up
    A. Project WITHOUT External Flash MX25R64 needed
    B. Project WITH External Flash MX25R64 needed
  2. Software Resources & Preparations
  3. Firmware Build & Compile
    A. Project WITHOUT External Flash MX25R64 needed
    B. Project WITH External Flash MX25R64 needed
  4. Validate DFU Process & WIFI SCAN

——————————————————————————————————————


1. Hardware Set Up

Hardware Kit on hand:

Note: Pease make sure to have both “Nordic nRF5340-DK” and “AN7002Q-DB-5340-M” connected and running during the WIFI+BLE (nRF7002+nRF5340) project development.

Hardware Network:
IDC Ribbon Wire(J-Link Cable): Connect nRF5340-DK to AN7002Q-DB-5340-M
USB Wire –Type C USB: Power supply to AN7002Q-DB-5340-M through USB TYPE-C
USB Wire-Micro USB: Power supply to nRF5340-DK through Micro USB


Schematic diagram of AN7002Q-DB-5340-M can be referenced for design as follows.

(Click on the image to zoom in.)

*nRF7002 module <- SPI -> nRF5340 module
*MX256R NOR Flahs <-QSPI-> nRF7002 module


!! Important Note:!!

The circuit of SW1(p1.08)/SW2(p1.09)/LED1(p1.06) on AN7002Q-DB-5340-M is NOT COMPATIBLE to Nordic WI-FI Control Pin of swctrl1(p1.08)/host_irq(p1.09)/grant(p1.06).
In this case, if you’re working with external flash MX25R64 for the WIFI project, Please avoid pin SW1/SW2/LED1 usage while LED2(p1.07) remains available as normal usage.
For the PCB design of end product/end device(mounted with AN7002Q & MDBT53 modules), the switch & LED should be configured to be SW1(p0.23)/SW2(p0.24)/LED1(p0.28).

Tuesday, October 7, 2025

Raytac & abietec Join the Embedded World North America 2025!


  [New Taipei, Taiwan / Los Angeles, USA]


We’re thrilled to announce that 
Raytac Group, including Raytac Corporation(USA) and abietecInc., will be joining Embedded World North America 2025, in November 4-6 at the Anaheim Convention Center, CA.

Come find us at Booth #5067 !

This year, we’re bringing lots of exciting news:

From Raytac:

  • Brand-new Nordic nRF54L series modules: AN54LQ and AN54LV(Product Link), built for Bluetooth® LE 6.0 with ultra-low power and strong RF performance.
  • full Channel Sounding demo on how precise measurement of multipath and distance can enhance real-time location accuracy, improve signal reliability, and optimize antenna placement.
  • Introducing you to our Ecosystem, including all our partners and technologies used in various applications.
  • Discover how our modules can reduce development time and costs, making your projects more efficient.
  • One-on-one consultations with our experts to help you find the right solutions for your needs.

From abietec:

  • ODM/OEM design services for everything wireless: Bluetooth®, Wi-Fi, mmWave, LoRa, NB-IoT…
    You name it!

More importantly,
Stop by our booth to explore new products, join fun interactive games, and win prizes!

Let Raytac & abietec be your bridge to product success, connecting great ideas with real-world wireless solutions.

We’re waiting for you at:
Hall C – Level 1
Booth 5067

For more details, don’t forget to check out:
1. Our website: http://www.raytac.com
2. Our LinkedIn:  https://www.linkedin.com/company/raytac/?viewAsMember=true
3. Our WordPress Blog:  https://raytac.blog/


Thursday, May 29, 2025

MCUboot DFU Guide For Raytac MDBT50Q-DB-40 (Using NCS V2.9.1)

 is guide teaches you how to use MCUboot for DFU (Device Firmware Update),

Combined with nRF Connect SDK (NCS) V2.9.1 to upgrade firmware on Raytac's MDBT50Q series modules.


Table of contents:

  1. Hardware Set Up
  2. Software Kits resource download & install
  3. Compile and load the program
    a. Open VS Code
    b. Project setup
    c. Setup the situation for DFU over UART or DFU over USB
    d. Start compiling your project
    e. Load your compiled program into the MDBT50Q-DB-40 demo board

  4. DFU to MDBT50Q-DB-40 over UART / USB
  5. Execute USB DFU using AuTerm
  6. DFU using your custom keys

1. Hardware setup
- Equip Raytac's MDBT50Q-DB-40 development board
- Ensure the board is connected via USB to your PC


2.Software Kits resources download & install
- Resources download:
nRF Connect for Desktop - Download nRF Connect for Desktop (Please Click Me)
nRF Command Line Tools - Download nRF Command Line Tools (Please Click Me)
Visual Studio Code - Download Visual Studio Code(Please Click Me)

Install nRF Connect for Desktop ➔ install Programmer and Toolchain Manager.


Open Toolchain Manager and install SDK V2.9.1.


Install Visual Studio Code


3. Compile and load the program
a. Open VS Code(Visual Studio Code)


Note:
If it's your first time using the software: after installing all the extensions, you should see the same on your screen.


b. Project setup
b.1 Create an example code(In this article: peripheral_uart)
Please refer to the following steps:
Create a new application ➔ Copy a sample ➔ NCS V2.9.1


b.2 Name the Project: peripheral_uart
Input peripheral_uart and the corresponding example program will appear in the options section below.


Note: We named the project peripheral_uart_mcuboot to distinguish it.
This project will create a directory named peripheral_uart_mcuboot.

c. Build an environment for DFU over UART or DFU over USB

- Create a new application ➔ Open

Right click on the project name you just created (peripheral_uart_mcuboot), a pop-up menu will appear. Select the first option "Show in Explorer" from the pop-up menu to display all project files.


Then select New File to create a sysbuild.conf file.


Select sysbuild.conf, left-click on it, and a blank box will show.


Input the file name and define: SB_CONFIG_BOOTLOADER_MCUBOOT=y


Parameters and instructions
Add a new file mcuboot.conf, in the sysbuild folder, and input the following parameters into the file. (Add relevant parameters according to UART or USB)
(Note: Please be informed if you want to use DFU over UART in the end, you should use UART when you first create the environment. Similarly, if you want to use DFU over USB, you should create the USB environment at the beginning.)

For DFU over UART
# Enable logging for MCUboot
CONFIG_LOG=y
CONFIG_MCUBOOT_LOG_LEVEL_WRN=y
# Enable Serial Recovery over UART
CONFIG_MCUBOOT_SERIAL=y
# Disable UART, since Serial Recovery uses it
CONFIG_UART_CONSOLE=n
# Configure the bootloader to use two slots
CONFIG_SINGLE_APPLICATION_SLOT=n
# Turn on a LED so we can see when Serial Recovery mode is active
CONFIG_MCUBOOT_INDICATION_LED=y


For DFU over USB
# Enable logging for MCUboot
CONFIG_LOG=y
CONFIG_MCUBOOT_LOG_LEVEL_WRN=y
# Enable Serial Recovery over UART
CONFIG_MCUBOOT_SERIAL=y
# Disable UART, since Serial Recovery uses it
CONFIG_UART_CONSOLE=n
# Configure bootloader to use two slots
CONFIG_SINGLE_APPLICATION_SLOT=n
# Turn on a LED so we can see when Serial Recovery mode is active
CONFIG_MCUBOOT_INDICATION_LED=y
# Configure serial recovery to use CDC_ACM, which by default uses the USB
CONFIG_BOOT_SERIAL_CDC_ACM=y
# Increase flash space for the MCUboot image to fit USB drivers
CONFIG_PM_PARTITION_SIZE_MCUBOOT=0x10000


Create a new file: mcuboot.overlay and add the following parameters.


For DFU over UART
/* Configure button and LED for Serial Recovery */
/ {
    aliases {
          mcuboot-button0 = &button0;
          mcuboot-led0 = &led0;
    };
  };


For DFU over USB
/* Configure button and LED for Serial Recovery */
/ {
    aliases {
          mcuboot-button0 = &button0;
          mcuboot-led0 = &led0;
    };
  };
/* Configure CDC ACM */
&zephyr_udc0 {
            cdc_acm_uart0: cdc_acm_uart0 {
                        compatible = "zephyr,cdc-acm-uart";
            };
};


Note: if you use DFU over USB, please enable the USB subsystem in prj.conf.


After all the setup is completed, you can start compiling your project.


d. Start compiling your project
Add Build Configuration ➔ Select target board ➔ In this example, choose raytac_mdbt50q_db_40/nrf52840.


Start compiling by clicking "Generate and Build" at the bottom-right corner.


e. Load your compiled program into the MDBT50Q-DB-40 demo board
After compiling without error, select the flash function to load your program into the MDBT50Q-DB-40 demo board.


If the below is shown, it means that you have successfully loaded your program into the demo board.


4. DFU to MDBT50Q-DB-40 over UART / USB
DFU over UART
Hold the SW2 button then plug the power into the USB connector.
The system will enter the bootloader mode.
You can then DFU the new firmware via the UART.


DFU over USB
If you update your firmware through USB, please also hold the SW2 button and connect the USB cable.


5. Execute USB DFU using AuTerm
AuTerm is a free-for-download PC software on Windows.
It allows you to update your new firmware on the MDBT50Q-DB-40 demo board.
Download link:
https://github.com/thedjnK/AuTerm/releases/download/v0.35a-pre/AuTerm_test_Win_x64_v0.35a.7z

Steps:
Select the tab Config to set the correct COM port.


Follow the sequences in the below screenshot.


You can use the file peripheral_uart_mcuboot.signed.bin for testing.
It is located in peripheral_uart_mcuboot/build.
Then follow the sequences in the below screenshot.
DFU will be completed when the progress reaches 100%.


6. DFU using your custom keys
When you compile the code, you will see the below warning.
Reason: It's required to have your own private key to ensure your product's security.
Following are the steps to enable security features.


Step 1. Create the key
First, install the imgtool program using pip.


Then use the following command to generate your private key in your project folder.
After the private key is generated, you can access it in your directory.


Step 2. Configure the project to use this key in sysbuild.conf

# Add MCUboot
SB_CONFIG_BOOTLOADER_MCUBOOT=y
#Add private key for MCUboot
SB_CONFIG_BOOT_SIGNATURE_KEY_FILE="\${APP_DIR}/private_key.pem"
# Configure key type
SB_CONFIG_BOOT_SIGNATURE_TYPE_ECDSA_P256=y


Step 3. Build and flash the project again. Your firmware will have security features.


Edited by Account Manager: Mr. Welson Kuo


Raytac Corporation 勁達國際電子股份有限公司 / Raytac Corporation (USA)
A Bluetooth, Wi-Fi, and LoRa Module Maker/ODM & OEM Manufacturer based on
Nordic nRF54; nRF53: nRF52; nRF51; nRF7002
Semtech Specification: SX1262


Bluetooth Specification: BT6.1 ; BT6 ; BT5.4 ; BT5.3 ; BT5.2.
Wi-Fi Specification: Wi-Fi 6
LoRa Specification: LoRaWAN


All products are FCC/IC/CE/Telec/KC/RCM/SRRC/NCC/WPC Pre-Certified.
http://www.raytac.com
https://www.raytac.com/contact/
email: sales@raytac.com
Tel: +886-2-3234-0208(TW)/+1-626-217-3139(USA)