Showing posts with label Dongle. Show all posts

Thursday, October 9, 2025

Raytac Product Change Notice(PCN) Announcement for Nordic SoC USB-A Dongle – MDBT50Q-RX Series

 Raytac Corporation would like to inform all customers and partners of an official Product Change Notice: PCN-25100801 regarding the following product series:


Affected Series
MDBT50Q-RX Series (nRF52840/833 based USB-A dongles)

Affected Models
MDBT50Q-RX (Product Link)
MDBT50Q-RX-33
MDBT50Q-RX-ATM (Product Link)
MDBT50Q-RX-ATMS

Reminder
This PCN involves:

  1. Update of Raytac’s company logo on the nameplate, and
  2. Addition of NCC logo on the back label.


There are no changes to product function, performance, quality, form factor, or safety compliances. All existing certifications and technical documentations remain valid.

We kindly invite our customers, distributors, and partners to update your records accordingly. For any questions or support regarding this update, feel free to reach out via: service@raytac.com.

Full details of the PCN please see below(Click on the images to zoom in).
Remark: Please take note of the final shipment date.


Friday, June 20, 2025

nRF52840 Nordic SoC USB Dongle – MDBT50Q-CX-40, Now Supports Zephyr RTOS

[New Taipei City, Taiwan] 

Zephyr RTOS hosted in Linux system has become a leading IoT ecosystem and it has been widely adopted as an open-source , real-time operation system for embedded devices, making it easier for developers to integrate the project smoothly.


Nordic Semiconductor , a main contributor to Zephyr, from the Bluetooth LE controller and USB stack to test tools, DFU frameworks.. and more, is making great effort and strategic decisions to adopt the Zephyr open-source into its nRFConnect(NCS) SDK program.

Raytac Corporation , a hardware-based manufacturer and a comprehensive solution developer with Nordic SoC development for multi-protocol complied wireless modules, now expands support for Zephyr RTOS ecosystem with its nRF52840 USB-C dongle – MDBT50Q-CX-40.

Zephyr support package for MDBT50Q-CX-40: 

https://docs.zephyrproject.org/latest/boards/raytac/mdbt50q_cx_40_dongle/doc/index.html


Reminder: The current Nordic released NCS SDK may NOT upgrade with Zephyr package at the same pace ; It is recommended to get the latest NCS SDK version to access the complete Zephyr support package.

If you’re interested in how Zephyr becomes powerful for a developer to start a project design easier and how the Nordic nRFConnect SDK community brings you to the world of Zephyr RTOS system, never hesitate to save the spot in the upcoming webinar on July 2nd, 2025. How Zephyr became the leading open-source RTOS for IoT (Click on the link to know more)

Resources:
– Begin your journey with Nordic nRFConnect SDK community – nRF Connect SDK Fundamentals
– User Manual of MDBT50Q-CX (nRF52840/nRF52833-based USB-C Dongle)


Edited by Business Development Manager: Ms. Jocelyn Tsai


Raytac Corporation 勁達國際電子股份有限公司 / Raytac Corporation (USA)
A Bluetooth, Wi-Fi, and LoRa Module Maker/ODM & OEM Manufacturer based on
Nordic nRF54; nRF53: nRF52; nRF51; nRF7002
Semtech Specification: SX1262


Bluetooth Specification: BT6.1 ; BT6 ; BT5.4 ; BT5.3 ; BT5.2.
Wi-Fi Specification: Wi-Fi 6
LoRa Specification: LoRaWAN


All products are FCC/IC/CE/Telec/KC/RCM/SRRC/NCC/WPC Pre-Certified.
http://www.raytac.com
https://www.raytac.com/contact/
email: sales@raytac.com
Tel: +886-2-3234-0208(TW)/+1-626-217-3139(USA)

Wednesday, July 17, 2024

Transition tips for program from MDBT50Q-RX (USB-A) to MDBT50Q-CX (USB-C)  with current NRF52840 project

 Intro:

This is a guidance provided for those who are going to transit (or replicate) their project from Raytac MDBT50Q-RX (USB-A Dongle) to MDBT50Q-CX(USB-C Dongle).  In addition to the hardware spec change (Compact Size , LED, Button, Pin definition change) , the key firmware configuration should be made with changes to fit new USB-C Dongle MDBT50Q-CX.


RX-1                    CX-1

MDBT50Q-RX                             MDBT50Q-CX


Table of Contents:

1. Comparison chart: MDBT50Q-RX(USB-A) & MDBT50Q-CX(USB-C)

2. Firmware configuration

3. Create a merged hex file (2 in 1 or 4 in 1)

4. Firmware flashing process


1. Comparison chart: MDBT50Q-RX & MDBT50Q-CX

Comparison chart


2. Firmware configuration : MDBT50Q-RX → MDBT50Q-CX

Edit your current MDBT50Q-RX firmware with configuration change to align the PIN change to accommodate the hardware change.

Option 1. Using nRF5 SDK:

Make the definition set up of LED, BUTTON pin in the highlighted 4 sections.

Firmware configuration-nRF5


Option 2. Using NCS V2.6.X:

Use the board name: nrf52840dongle_nrf52840 and add the overlay file:

nrf52840dongle_nrf52840.overlay to the program (Devicetree Overlays),

then configure the below code definition into the overlay file:

/ {
   leds {
             compatible = "gpio-leds";
             led0_green: led_0 {
                      gpios = <&gpio0 6 GPIO_ACTIVE_LOW>;
                      label = "Green LED 0";
             };
             led1_red: led_1 {
                     gpios = <&gpio0 8 GPIO_ACTIVE_LOW>;
                     label = "Red LED 1";
             };
};

  buttons {
  compatible = "gpio-keys";
  button0: button_0 {
                  gpios = <&gpio1 6(GPIO_PULL_UP | GPIO_ACTIVE_LOW)>;
                  label = "Push button switch 0";
                                   };
};
};

Firmware configuration-NCS


3. Create a merged hex file (2-in-1 or 4-in-1 hex file)


3A. Bootloader public key product

nrfutil keys generate public_key.pem → for zipping new firmware

nrfutil keys display --key pk --format code public_key.pem --out_file public_key.c

→ include public key to compile bootloader hex file

3A-1

3A-2


3B. Examples Demo

nRF5 SDK: nRF5_SDK_17.1.0_ddde560\examples\ble_peripheral\ble_app_uart\pca10056\s140

NCS V2.6.X: ncs\v2.6.0\nrf\samples\bluetooth\peripheral_uart


3C. How to generate bootloader setting file (if you need bootloader):

nrfutil.exe settings generate --family NRF52840 --application nrf52840_xxaa.hex --application-version 255 --bootloader-version 2 --bl-settings-version 1 bootloader_settings.hex


3D. Merge and create a 2-in-1 or 4-in-1 hex file

a). Merge 2-in-1 (no Bootloader file required):

mergehex.exe -m s140_nrf52_7.2.0_softdevice.hex nrf52840_xxaa.hex -o merge.hex

3D-a


b). Merge 4-in-1 (with Bootloader file & Bootloader settings file required):

mergehex.exe -m bootloader.hex bootloader_settings.hex  s140_nrf52_7.2.0_softdevice.hex nrf52840_xxaa.hex -o merge.hex

3D-b


4. Firmware flashing process

MDBT50Q-RX(USB-A):Manual wiring is required to have the firmware uploaded.

Please refer to the article: Firmware Coding & DFU onto MDBT50Q-RX

MDBT50Q-CX(USB-C):Built-in open bootloader included for simple DFU process..

Please refer to the article: User Manual of MDBT50Q-CX (nRF52840/nRF52833-based USB-C Dongle)


Edited by Sales Manager:
 Ms. Jocelyn Tsai
Technical guidance provided by Firmware Deputy Manager: Mr. Stanley Huang

Wednesday, July 10, 2024

User Manual of MDBT50Q-CX (nRF52840/nRF52833-based USB-C Dongle)

Intro:

MDBT50Q-CX is an advanced version of Raytac’s MDBT50Q-RX(USB-A Dongle).

MDBT50Q-CX has a more compact size, equips an up-to-date Type C USB Connector, and it has a built-in open bootloader for simple DFU process.

If you’ve been developing projects using MDBT50Q-RX in the past, you can find out in this manual how MDBT50Q-CX makes firmware compiling and loading much easier than before.

If you want to load firmware into MDBT50Q-CX, no wiring is needed. 

Simply plug the dongle into your device and USB DFU will be available.

MDBT50Q-CX (USB-C Dongle, nRF52840/nRF52833 solution): Product link

image

Size: 15.10 x32.85mm (0.59x1.29inches)


Table of Contents

A. Hardware intro

B. Software development environment setup

C. Firmware Implementation with NCS (nRF Connect SDK) or NRF5 SDK

D. Execute DFU (Device Firmware Update)


A. Hardware Intro

 <Pin Allocation>

2

< Schematic> (Click on the image to redirect to product page for Higher resolution photo)


B.  Software development environment setup

Option 1. Compile in NCS(nRF Connect SDK)

(1) Install nRF Connect for Desktop:

B1


(2) Install Toolchain Manager and Programmer

B2


(3) Install nRF Connect SDK (NCS) → V2.6.0 is recommended.

B3


Option2. Compile in nRF5 SDK

(1) Download open source nRF5 SDK (Recommend: download the latest version:  17.1.0)

B4


(2) Install Segger Embedded Studio v5.42a (Recommended version)

https://www.segger.com/downloads/embedded-studio/

B5

※Welcome to contact Raytac sales team for v5.42a file of Segger Embedded Studio.


C. Implement firmware in NCS (nRF Connect SDK) or NRF5 SDK

We will use the two example codes below for this demo:

C1. NCS (nRF Connect SDK):

Example code path: \v2.6.0\nrf\samples\bluetooth\peripheral_uart


Wednesday, August 26, 2020

Nordic nRF52 Module by Raytac (Advanced Line Series)

Bluetooth has become the basic feature for applications nowadays. 

To fulfill the challenge of coming various Bluetooth function demands, Nordic Semiconductor provides a rage of nRF52 solutions from basic to advanced for customer's selection. Raytac extent this advantage and offer modules with different antenna and form factors based on individual nRF52 solution.

This article, Raytac listed the advanced line modules: MDBT50Q, MDBT50, and MDBT42Q series which deployed Nordic Semiconductor's nRF52840, nRF52833, nRF52832 solutions.

Customers are encouraged may click below link to find more module information from Raytac's website!

nRF52840 Modules: GPIO: 48  Flash: 1MB / RAM: 256K

nRF52833 Modules: GPIO: 48/18  Flash: 512K  / RAM: 128K 

nRF52832 Modules: GPIO: 32/20  Flash: 512K  / RAM: 64K 

Raytac Corporation 勁達國際電子有限公司

A BT5.2 & BT5.1 & BT5 module maker based on Nordic nRF52 & nRF51 solution 
(nRF5340 & nRF52840 & nRF52833 & nRF52832 & nRF52820 & nRF52811 & nRF52810 & nRF52805 & nRF51822)
www.raytac.comemail: cs@raytac.comTel: +886.2.3234.0208

Friday, February 7, 2020

Firmware Coding & DFU onto MDBT50Q-RX

Hi there, 

Here introduce the firmware perspective about how to program your code onto MDBT50Q-RX dongle.

Believed all readers have done the hardware setting and now has well prepared to load the code onto the dongle. (If not yet done the hardware setting, pls find it here)

In this blog, we will introduce the procedure based on below 2 scenarios
  • First time to load the code
  • DFU Firmware update by USB or OTA (through Bluetooth over the air)

First time to load the code:

1. Generate Public Key

For security reason, Public Key is the first step to proceed (DOS Environment MUST)
   Command to produce Public Key is in below:

      nrfutil keys generate public_key.pem
nrfutil keys display --key pk --format code public_key.pem --out_file public_key.c

2. Edit Bootloader (Use Keil C as the example)
    2.1 Open a project

\nRF5_SDK_15.3.0_59ac345\examples\dfu\secure_bootloader\pca10056_ble

    2.2 Paste the Public Key produced from step 1 in the red square.

    2.3 Set up Button behavior to trigger the Bootloader function start
    2.3.1 Activate to enter the Bootloader function by using button pressed. (Developers may change to others if don't like this way. Just enter "secure_bootloader" project and modify "sdk_config.h")


    2.3.2 Modify button pin no. (Developers can modify "sdk_config.h" in "secure_bootloader" project)


    2.3.3 Modify LED pin no. (Developers can modify "pca10056.h" in "secure_bootloader" project)


3. Edit Application
   Open and edit the project

\nRF5_SDK_15.3.0_59ac345\examples\peripheral\usbd_ble_uart\pca10056\s140\arm5_no_packs

4. Generate bootloader_settings.hex file

nrfutil.exe settings generate --family NRF52840 --application USBD_TO_UART.hex --application-version 3 --bootloader-version 2 --bl-settings-version 1 bootloader_settings.hex

5. Merge files
1Bootloader.hex
2bootloader_settings.hex
3s140_nrf52_6.1.1_softdevice.hex
4USBD_TO_UART.hex
mergehex.exe -m Bootloader.hex bootloader_settings.hex -o Combind0.hex
mergehex.exe -m Combind0.hex s140_nrf52_6.1.1_softdevice.hex -o Combind1.hex
mergehex.exe -m Combind1.hex USBD_TO_UART.hex x -o USBD_TO_UART_BT_SD_APP.hex


6. Use nRFconnect to burn the merged code onto dongle (nRF52840 IC)
Launch the programmer

Load the merged .hex file
Program the .hex file


Right here, the code should be loaded onto dongle successfully.
Hope all you guys enjoy the journey and completed the setup.

In case you are not happy about the code you just loaded?
No worry, we now introduce DFU process in below to retrieve your happiness.


Friday, April 26, 2019

Raytac's UART Service (AT Command Central / Master) -MDBT50Q-RX-ATM How do you get started?

Easy! At least when you know what to do

Many of our customers just want a device that provides Bluetooth technology to their product or solution that they've developed. However, utilizing the full capacity of the Bluetooth protocol is not always easy and sometimes not even necessary. For these customers, choosing Raytac's modules/dongles loaded with AT Command, such as MDBT50Q-RX-ATM, is the best choice.
But even a product such as MDBT50Q-RX-ATM that is supposed to make it easy for customers to wirelessly transfer data from one device to the next can be difficult to use - especially when you don't know HOW.

So, I thought we'd take this in two simple steps.

  1. Device Name
To be really sure that you can connect to the device thus making you able to pair with it, you will have to make sure that the device name setting in the AT Command list is set to the name that the other (slave) device is set to.
For example, if your slave device set to have the name "ILoveBluetooth" and you haven't changed the settings in the AT Command, you will not be able to pair your MDBT50Q-RX-ATM with this device.
As you can see in the picture below, the default setting for this device's name is "Raytac AT-UART".


When editing this name, you get a smaller window like this popping up:


Make sure that the name set on your device that you wish to connect with the dongle AND this name in the AT-Command device's list are the same. You will in this case need to change this to "ILoveBluetooth".
  1. RSSI
This is a trickier part - especially when you don't know what it is.
RSSI stands for Received Signal Strength Indicator and, just like the name implies, is a value of strength of which the incoming signal has to be in order to even be considered by the scanning device.
In other words, the lower the value is set to, the weaker signals the scanning device will show.
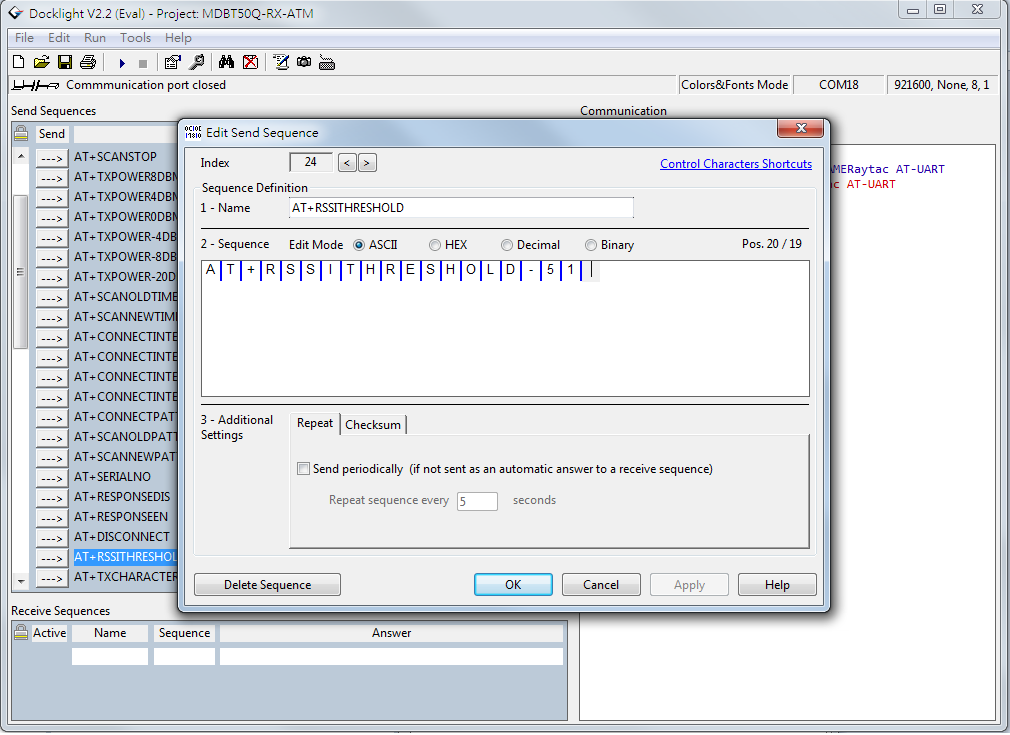
The standard value of Raytac's AT-Command modules/dongle is -51 and the setting screen looks like this:


  1. Slave device's SDK
What many new customers seem to believe is that if you use our AT-Command modules/dongles, you won't need to do anything - they will just magically communicate with each other somehow.
I hate to break it to you, but no... that's not how it works. You will have to at least make sure that the two devices "speak the same language". As for our AT-Command modules/dongles, or in this case MDBT50Q-RX-ATM, it is through a "language" (a.k.a. protocol) called UART.
First of all, "UART" is not "U-ART" although it's kind of pronounced that way, but it's an abbreviation that stands for Universal Asynchronous Receiver/Transmitter. You can read about it here.
I will spare you all the details about the UART protocol itself, but one thing that we will need to make sure of is that you have it installed onto your slave device.

Hopefully, you've downloaded Nordic's latest SDK and you have it ready on your computer. You can download them directly HERE.
Note: This file is quite big (~130MB), so DO NOT click on the last link if you don't want to download this on your current device.

Inside this file, you will find a lot of stuff. However, for this particular case, we only really need to care about the "examples" folder.


In this folder, we will have (surprise surprise!) even more folders :D
As per usual, we don't have to check them all out. In this case, we specifically only want to check the "ble_peripheral" and the "peripheral" folders.


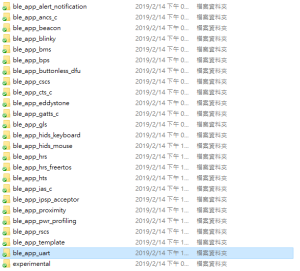
Go into the former folder and you'll find see the following folders in which you will want to enter the "ble_app_uart" folder.:


In this folder, you will see five more folders and two files, but we only want to check out one of them depending on which chip type you're using in your slave device. Let's say you're using a nRF52832 chip (or module such as MDBT42Q-P512KV2), then you'd want to enter the first folder called pca10040. Check the picture below to see which folder you'd want to enter:


Assuming you entered the folder that I mentioned above, you will then want to enter the "s132" folder.


Once you're in here, I am pretty sure you developers out there know what to pick :)

In the beginning of this section, however, I also mentioned another folder called "peripheral" which we will guide you through now - even if it's very similar to what we just did.

As you can see, there are a TON of folders in here, but we will cherry-pick our folders here too.
Let's say that you'd like to be able to make your slave device to read and transmit information from a sensor. Supposedly, most sensors use either the I2C or the SPI interface. In each respective folder, you will find the same folder layout as in the previous picture - folders representing what chip/module you have.
The main point of showing you this is simply because from these two folders, you can snatch the small amount of code that you need to edit the main code of your UART main-code so that you can both read and send the data from the sensor you might have.

Hopefully, you've now started to realize how these things come together and we can finally start to connect these devices. This takes us to the next step:

  1. ATSCANNEW
Once that's done, you will need to use your AT-Command module/dongle (here MDBT50Q-RX-ATM) to scan for the slave device that you want to pair. To do this, you first have to make sure your slave device is broadcasting, then execute a command called ATSCANNEW.
Once you've done so, your MDBT50Q-RX-ATM's blue LED will hopefully go from fast blinking to a slower blinking. This means that your two devices, master and slave, have now paired successfully. Wohoo! :)

We hope that this makes our AT-Command modules/dongles even easier to use!
Raytac wishes you all happy tinkering :)

Raytac Corporation 勁達國際電子有限公司 A BT 5.1 & BT 5 & BT 4.2 module maker based on Nordic nRF51 & nRF52 solution (nRF52840 & nRF52832 & nRF52811 & nRF52810 & nRF51822)
www.raytac.com email: cs@raytac.com Tel: +886.2.3234.0208

Wednesday, April 3, 2019

New Distributor Announcement (Turkey & Egypt) - Özdisan Elektronik A.Ş.

Raytac is glad to announce that we has expanded our distributor network to Turkey and Egypt. The distribution agreement with Özdisan Elektronik A.Ş. covers FAE, Engineering, Sales, Marketing and support for Raytac Corporation's full range of module lines, including nRF52840, nRF52811, nR52832 and nRF51 series in territory.


Özdisan Elektronik A.Ş. was founded in 1980 and currently is the leading electronic components distributor in Turkey. The headquarter located in Istanbul and built up 4 sales offices and warehouse in major cities in Turkey cities(Istanbul, Ankara, Izmir, Bursa). Employed RD FAE capability to support the development and evaluation consultant and also Marketing & Sales service.

Not only distribution service, Özdisan Elektronik A.Ş. but also expanded business to PCB & PCB assembly, LED lighting solutions, aluminum coolers aimed to achieve the synergy collaboration all the way from product idea emerging, developing and mass production.

IoT now has become a part of people's life experience and Bluetooth is the key protocol connecting between human and IoT appliance.

Raytac employees Nordic's solution developed series of modules which is a recommended 3rd party module maker listed in Nordic website. All modules from Raytac comes with superior RF efficiency, reliable quality, Bluetooth certification granted, and FCC/IC/CE/Telec/KC/SRRC/NCC pre-certified. Developers who deployed Raytac's module into products may save lots of efforts in RF design expertise and obtain the low cost and time-to-market efficiency.

With Raytac' Bluetooth Low Energy module joined the line card, Özdisan Elektronik A.Ş.  expects to advance the service from the Bluetooth world connecting to an unlimited future.


Özdisan Elektronik Paz. San. ve Tic. A.Ş.
Name: Okan Abdi İbrahim Ekmekçi
Title: Genel Müdür Yardımcısı
Deputy General Manager
Saha Uygulama Mühendisi
Field Application Engineer
Email: oabdi@ozdisan.com iekmekci@ozdisan.com
Tel.: +90 (61) 420 1882 Tel: +90 (61) 420 1882 /Ext:230
Mobile: +90 (534) 014 78 76
Web: www.ozdisan.com


Raytac Corporation 勁達國際電子有限公司 A BT 5.1 & BT 5 & BT 4.2 module maker based on Nordic nRF51 & nRF52 solution (nRF52840 & nRF52832 & nRF52811 & nRF52810 & nRF51822)
www.raytac.com email: cs@raytac.com Tel: +886.2.3234.0208