Showing posts with label MDBT50Q-RX. Show all posts

Thursday, October 9, 2025

Raytac Product Change Notice(PCN) Announcement for Nordic SoC USB-A Dongle – MDBT50Q-RX Series

 Raytac Corporation would like to inform all customers and partners of an official Product Change Notice: PCN-25100801 regarding the following product series:


Affected Series
MDBT50Q-RX Series (nRF52840/833 based USB-A dongles)

Affected Models
MDBT50Q-RX (Product Link)
MDBT50Q-RX-33
MDBT50Q-RX-ATM (Product Link)
MDBT50Q-RX-ATMS

Reminder
This PCN involves:

  1. Update of Raytac’s company logo on the nameplate, and
  2. Addition of NCC logo on the back label.


There are no changes to product function, performance, quality, form factor, or safety compliances. All existing certifications and technical documentations remain valid.

We kindly invite our customers, distributors, and partners to update your records accordingly. For any questions or support regarding this update, feel free to reach out via: service@raytac.com.

Full details of the PCN please see below(Click on the images to zoom in).
Remark: Please take note of the final shipment date.


Wednesday, July 17, 2024

Transition tips for program from MDBT50Q-RX (USB-A) to MDBT50Q-CX (USB-C)  with current NRF52840 project

 Intro:

This is a guidance provided for those who are going to transit (or replicate) their project from Raytac MDBT50Q-RX (USB-A Dongle) to MDBT50Q-CX(USB-C Dongle).  In addition to the hardware spec change (Compact Size , LED, Button, Pin definition change) , the key firmware configuration should be made with changes to fit new USB-C Dongle MDBT50Q-CX.


RX-1                    CX-1

MDBT50Q-RX                             MDBT50Q-CX


Table of Contents:

1. Comparison chart: MDBT50Q-RX(USB-A) & MDBT50Q-CX(USB-C)

2. Firmware configuration

3. Create a merged hex file (2 in 1 or 4 in 1)

4. Firmware flashing process


1. Comparison chart: MDBT50Q-RX & MDBT50Q-CX

Comparison chart


2. Firmware configuration : MDBT50Q-RX → MDBT50Q-CX

Edit your current MDBT50Q-RX firmware with configuration change to align the PIN change to accommodate the hardware change.

Option 1. Using nRF5 SDK:

Make the definition set up of LED, BUTTON pin in the highlighted 4 sections.

Firmware configuration-nRF5


Option 2. Using NCS V2.6.X:

Use the board name: nrf52840dongle_nrf52840 and add the overlay file:

nrf52840dongle_nrf52840.overlay to the program (Devicetree Overlays),

then configure the below code definition into the overlay file:

/ {
   leds {
             compatible = "gpio-leds";
             led0_green: led_0 {
                      gpios = <&gpio0 6 GPIO_ACTIVE_LOW>;
                      label = "Green LED 0";
             };
             led1_red: led_1 {
                     gpios = <&gpio0 8 GPIO_ACTIVE_LOW>;
                     label = "Red LED 1";
             };
};

  buttons {
  compatible = "gpio-keys";
  button0: button_0 {
                  gpios = <&gpio1 6(GPIO_PULL_UP | GPIO_ACTIVE_LOW)>;
                  label = "Push button switch 0";
                                   };
};
};

Firmware configuration-NCS


3. Create a merged hex file (2-in-1 or 4-in-1 hex file)


3A. Bootloader public key product

nrfutil keys generate public_key.pem → for zipping new firmware

nrfutil keys display --key pk --format code public_key.pem --out_file public_key.c

→ include public key to compile bootloader hex file

3A-1

3A-2


3B. Examples Demo

nRF5 SDK: nRF5_SDK_17.1.0_ddde560\examples\ble_peripheral\ble_app_uart\pca10056\s140

NCS V2.6.X: ncs\v2.6.0\nrf\samples\bluetooth\peripheral_uart


3C. How to generate bootloader setting file (if you need bootloader):

nrfutil.exe settings generate --family NRF52840 --application nrf52840_xxaa.hex --application-version 255 --bootloader-version 2 --bl-settings-version 1 bootloader_settings.hex


3D. Merge and create a 2-in-1 or 4-in-1 hex file

a). Merge 2-in-1 (no Bootloader file required):

mergehex.exe -m s140_nrf52_7.2.0_softdevice.hex nrf52840_xxaa.hex -o merge.hex

3D-a


b). Merge 4-in-1 (with Bootloader file & Bootloader settings file required):

mergehex.exe -m bootloader.hex bootloader_settings.hex  s140_nrf52_7.2.0_softdevice.hex nrf52840_xxaa.hex -o merge.hex

3D-b


4. Firmware flashing process

MDBT50Q-RX(USB-A):Manual wiring is required to have the firmware uploaded.

Please refer to the article: Firmware Coding & DFU onto MDBT50Q-RX

MDBT50Q-CX(USB-C):Built-in open bootloader included for simple DFU process..

Please refer to the article: User Manual of MDBT50Q-CX (nRF52840/nRF52833-based USB-C Dongle)


Edited by Sales Manager:
 Ms. Jocelyn Tsai
Technical guidance provided by Firmware Deputy Manager: Mr. Stanley Huang

Wednesday, July 10, 2024

User Manual of MDBT50Q-CX (nRF52840/nRF52833-based USB-C Dongle)

Intro:

MDBT50Q-CX is an advanced version of Raytac’s MDBT50Q-RX(USB-A Dongle).

MDBT50Q-CX has a more compact size, equips an up-to-date Type C USB Connector, and it has a built-in open bootloader for simple DFU process.

If you’ve been developing projects using MDBT50Q-RX in the past, you can find out in this manual how MDBT50Q-CX makes firmware compiling and loading much easier than before.

If you want to load firmware into MDBT50Q-CX, no wiring is needed. 

Simply plug the dongle into your device and USB DFU will be available.

MDBT50Q-CX (USB-C Dongle, nRF52840/nRF52833 solution): Product link

image

Size: 15.10 x32.85mm (0.59x1.29inches)


Table of Contents

A. Hardware intro

B. Software development environment setup

C. Firmware Implementation with NCS (nRF Connect SDK) or NRF5 SDK

D. Execute DFU (Device Firmware Update)


A. Hardware Intro

 <Pin Allocation>

2

< Schematic> (Click on the image to redirect to product page for Higher resolution photo)


B.  Software development environment setup

Option 1. Compile in NCS(nRF Connect SDK)

(1) Install nRF Connect for Desktop:

B1


(2) Install Toolchain Manager and Programmer

B2


(3) Install nRF Connect SDK (NCS) → V2.6.0 is recommended.

B3


Option2. Compile in nRF5 SDK

(1) Download open source nRF5 SDK (Recommend: download the latest version:  17.1.0)

B4


(2) Install Segger Embedded Studio v5.42a (Recommended version)

https://www.segger.com/downloads/embedded-studio/

B5

※Welcome to contact Raytac sales team for v5.42a file of Segger Embedded Studio.


C. Implement firmware in NCS (nRF Connect SDK) or NRF5 SDK

We will use the two example codes below for this demo:

C1. NCS (nRF Connect SDK):

Example code path: \v2.6.0\nrf\samples\bluetooth\peripheral_uart


Friday, February 7, 2020

Firmware Coding & DFU onto MDBT50Q-RX

Hi there, 

Here introduce the firmware perspective about how to program your code onto MDBT50Q-RX dongle.

Believed all readers have done the hardware setting and now has well prepared to load the code onto the dongle. (If not yet done the hardware setting, pls find it here)

In this blog, we will introduce the procedure based on below 2 scenarios
  • First time to load the code
  • DFU Firmware update by USB or OTA (through Bluetooth over the air)

First time to load the code:

1. Generate Public Key

For security reason, Public Key is the first step to proceed (DOS Environment MUST)
   Command to produce Public Key is in below:

      nrfutil keys generate public_key.pem
nrfutil keys display --key pk --format code public_key.pem --out_file public_key.c

2. Edit Bootloader (Use Keil C as the example)
    2.1 Open a project

\nRF5_SDK_15.3.0_59ac345\examples\dfu\secure_bootloader\pca10056_ble

    2.2 Paste the Public Key produced from step 1 in the red square.

    2.3 Set up Button behavior to trigger the Bootloader function start
    2.3.1 Activate to enter the Bootloader function by using button pressed. (Developers may change to others if don't like this way. Just enter "secure_bootloader" project and modify "sdk_config.h")


    2.3.2 Modify button pin no. (Developers can modify "sdk_config.h" in "secure_bootloader" project)


    2.3.3 Modify LED pin no. (Developers can modify "pca10056.h" in "secure_bootloader" project)


3. Edit Application
   Open and edit the project

\nRF5_SDK_15.3.0_59ac345\examples\peripheral\usbd_ble_uart\pca10056\s140\arm5_no_packs

4. Generate bootloader_settings.hex file

nrfutil.exe settings generate --family NRF52840 --application USBD_TO_UART.hex --application-version 3 --bootloader-version 2 --bl-settings-version 1 bootloader_settings.hex

5. Merge files
1Bootloader.hex
2bootloader_settings.hex
3s140_nrf52_6.1.1_softdevice.hex
4USBD_TO_UART.hex
mergehex.exe -m Bootloader.hex bootloader_settings.hex -o Combind0.hex
mergehex.exe -m Combind0.hex s140_nrf52_6.1.1_softdevice.hex -o Combind1.hex
mergehex.exe -m Combind1.hex USBD_TO_UART.hex x -o USBD_TO_UART_BT_SD_APP.hex


6. Use nRFconnect to burn the merged code onto dongle (nRF52840 IC)
Launch the programmer

Load the merged .hex file
Program the .hex file


Right here, the code should be loaded onto dongle successfully.
Hope all you guys enjoy the journey and completed the setup.

In case you are not happy about the code you just loaded?
No worry, we now introduce DFU process in below to retrieve your happiness.


Wednesday, March 27, 2019

Burn your firmware - onto MDBT50Q-RX, that is.

Hi there, folks!

Here introduce the hardware setting perspective to burn your firmware onto MDBT50Q-RX Dongle.

(if you are looking for firmware coding setting, please visit "Firmware Coding & DFU onto MDBT50Q-RX")

So you have hopefully downloaded your IDE, you have written your code which you then plan to copy it over onto your MDBT50Q-RX and make it execute your master plan to take over the world!
Seriously, don't underestimate the Nordic nRF52840 based MDBT50Q-RX. USB sticks with Bluetooth can do wonders ;)
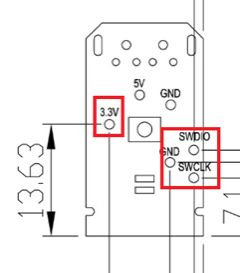
So, first of all, in order to be able to burn your code onto the USB Dongle, you will have to know the nerdy parts which includes which pins you will have to connect to. In our very well documented specification sheet for MDBT50Q-RX on section 8 which is called "Reference Circuit", you will find parts down to the left that has "3.3V/SWDIO/SWCLK/GND" marks on it:


Further down in the specification sheet, in section 9, you will find pictures illustrating where exactly on the PCB you can find these pins:
Pin locations

Now we know what to look for and where they are, so now we have only got to tell you how to use them.

Some people might not know this, but for developing these things, you need to get something called J-Link to connect your MDBT50Q-RX to your desktop. However, since this J-Link, when buying the official one from SEGGER, is very expensive, we strongly recommend you to just buy the nRF52840-DK from Nordic Semiconductor as it can be used as a J-Link through their software development kit (SDK) called nRFgo Studio and is MUCH CHEAPER than the official J-Link from SEGGER is.
Sidenote: There are a couple of other reasons why you should just get your hands on a nRF52840-DK from Nordic Semiconductor instead of getting a SEGGER J-Link, but that's not the topic of this post ;)

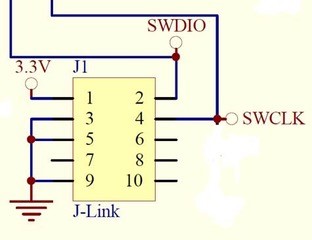
When this is done, this is finally how you connect your MDBT50Q-RX to your J-Link to make it all work:

MDBT50Q-RX and J-Link connection

Here you will have to pay attention to the fact that you have to connect J-Link pins 3, 5 & 9 to GND. Otherwise, you won't be able to burn anything onto your dear MDBT50Q-RX.
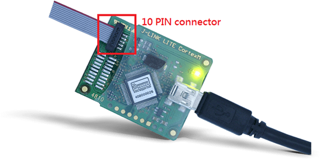
The physical connection should look like this:

J-Link Cable Connection

Pay attention to the direction of the cable, because that will also matter. The direction we mean in this case is which way the slim strip of red is facing.

As we have just revised our MDBT50Q-RX, our customers who have been developing firmware for our USB dongle should take a look at our previous blog post in which we explain about the changes made or contact us directly at service@raytac.com

Have a good day and we at Raytac wish you smooth and happy tinkering :)

Raytac Corporation 勁達國際電子有限公司
A BT5 & BT 4.2 & BTv4.1 module maker based on Nordic nRF51 & nRF52 solution
(nRF51822 & nRF51422 & nRF52832 & nRF52810 & nRF52840)

www.raytac.com email: cs@raytac.com Tel: +886.2.3234.0208

Thursday, March 21, 2019

Raytac Product Change Notice (PCN) Announcement for nRF52840 Dongle: MDBT50Q-RX

Dear Customers,

To enable hardware reset function in Raytac's nRF52840 dongle (P/N: MDBT50Q-RX), Raytac's has revised the circuit and issued the PCN accordingly.

Description of the Change:
1. Change circuit design to enable the hardware reset function.
2. Change PCB Imprint
3. Change Label
4. Change Part No.

Here provided the content of the PCN for customer's reference.


Customers those who have been developing firmware based on our previous dongle, please contact us at service@raytac.com to request latest sample for evaluation.

Raytac Corporation 勁達國際電子有限公司
A BT5 & BT 4.2 & BTv4.1 module maker based on Nordic nRF51 & nRF52 solution
(nRF51822 & nRF51422 & nRF52832 & nRF52810 & nRF52840)

www.raytac.com email: cs@raytac.com Tel: +886.2.3234.0208

Monday, January 28, 2019

How To Use MDBT50Q Demo Board (MDBT50Q-DB-40 / MDBT50Q-DB-33)

Here provides an easy introduction of How to set up of nRF52840 & nRF52833 Module Demo board MDBT50Q-DB-40 (for nRF52840) & MDBT50Q-DB-33 (for nRF52833)
MDBT50Q-DB-40, built by Raytac's MDBT50Q-1MV2  with Red PCBA deployed nRF52840 SoC with Bluetooth 5 & Thread Combo module Demo Board, equipped Raytac's MDBT50Q-1MV2  with 1MB Flash Memory and 256KB RAM and Chip Antenna.

MDBT50Q-DB-33, build by Raytac's MDBT50Q-512K with Green PCBA deployed nRF52833 SoC with Bluetooth 5 & Thread Combo module demo board, equipped Raytac's MDBT50Q-512K  with 512KB Flash Memory and 128KB RAM and Chip Antenna.

Both demo boards are BT5.1 / BT5 / BT4.2 Bluetooth qualified and FCC, IC, CE, Telec, KC, SRRC, RCM, NCC, WPC pre-certified.


Friday, January 25, 2019

MDBT50Q-RX, a nRF52840 USB Dongle, delivers an easy implement for M2M IoT application

Raytac’s BT5 certified nRF52840 USB dongle, MDBT50Q-RX, eliminating the need for RF design expertise, and speeding time to market for complex M2M IoT applications. The Dongle built by Raytac's MDBT50Q-P1M module with FCC/IC/CE/Telec/KC/SRRC/NCC/RCM/WPC certification.

Wednesday, December 19, 2018

Raytac Released nRF52840 USB Dongle "MDBT50Q-RX"

Raytac released nRF52840 USB Dongle which deployed MDBT50Q-P1M module offer a Bluetooth 5 specification granted, FCC/IC/Telec(MIC)/KC/SRRC/NCC/WPC certified, CE/RCM compliant solution.