Showing posts with label nRF54. Show all posts

Wednesday, June 17, 2026

User Manual of Raytac AN54LV-DB-15 (Nordic nRF54L15 Module DevKit) Development & Programming Environment

Want to get started quickly with Raytac's AN54LV-15 module? We provide a simple tutorial to guide you step-by-step through setting up the development and programming environment for the nRF54L15 module Development Board (AN54LV-DB-15) and nRF54L15-DK.


Table of Contents
1. Hardware Environment Setup
2. Software Development Kit Resources and Environment Setup
3. Software/Firmware Application Development
4. Flashing / Programming

Related products:
nRF54L15 SoC Spec  << access link
Nordic nRF54L15 DK  << access link
Raytac AN54LV-DB-15 (Development Kit used in this article) << access link
Zephyr documentation of AN54LV-DB-15 << access link
Raytac AN54LV-DB-U15 (Development Kit with u.FL Connector for external antenna) << access link
Raytac AN54LV-DB-K15 (Development Kit with antenna pin) << access link

User manual of Raytac AN54LQ-DB-15 << access linkNordic nRF54L15-DK


1. Hardware Environment Setup
The required equipments are as follows:

  • 1 x Nordic nRF54L15-DK: PCA10156(1.0.0)
  • 1 x AN54LV-DB-15 (Raytac nRF54L15 module Development Board)
  • 1 x IDC Ribbon Cable
  • 2 x USB Type-C Connection Cables

* Reminder: The "Nordic nRF54L15-DK" and "Raytac AN54LV-DB-15 Development Board" must be used together to proceed with application development and flashing firmware into the Raytac AN54LV-DB-15 development board.

Setup Steps:
Step 1: Connect the J-Link on the Nordic DK with the AN54LV-DB-15 using the IDC ribbon cable.


Make sure to match the red side of the IDC ribbon cable with "1" printed on the AN54LV-DB-15's J-Link socket.


Step 2: Use the Type-C USB cables to supply power to both the nRF54L15-DK and the AN54LV-DB-15.


The outcome should be same as the picture above.

Step 3: AN54LV-DB-15 Schematic(Click on the schematic to zoom in):


2. Software Development Kit Resources and Environment Setup
Software Tool kits & Download Links:
Download nRF Connect for Desktop: Download nRF Connect For Desktop (Please Click Me)
Download nRF Command Line Tools: Download nRF Command Line Tools (Please Click Me)
Download Visual Studio Code(VS Code): Download nRF Command Line Tools (Please Click Me)

Setup Steps:
Step 1: Download the latest version of nRF Connect for Desktop. Choose the Windows 64-bit - version 5.3.1 installer (nrfconnect-setup-5.3.1-x64.exe). Once finished, you will see " nRF Connect for Desktop" on your PC.

Step 2: Download the latest version of nRF Command Line Tools. Choose the Windows X86 64 - version 10.24.2 installer (nrf-command-line-tools-10.24.2-x64.exe)

* Reminder: During the installation of the above two programs, a window may pop up prompting that SEGGER J-LINK needs to be installed or updated concurrently.

If you’re initiating Segger Embedded Studio (SES) application, please check the guideline here(Click me)\


Step 3: Download the latest version of Visual Studio Code (VS Code). Choose Windows VSCodeUserSetup-x64 version 1.122 (VSCodeUserSetup-x64-1.122.1.exe). Once complete, you will see "Visual Studio Code" on your PC.

Step 4: After installation is complete, you can verify the installed packages in your PC's Control Panel under "Programs and Features":


3. Software/Firmware Application Development
You can develop application programs within the VS Code IDE development environment.
Below steps are how to install and select your target SDK version (nRF Connect SDK v3.3.0 in this article):

Step 1: Launch "VS Code"-> Select "nRF Connect" icon/extension on the side menu.


Click "Manage SDKs" and then select "Install SDK".


Step 2: Select "nRF Connect SDK".


Step 3: You will see several available versions of nRF Connect SDK vx.x.x. It is highly recommended to choose and install NCS v3.3.0 or later. In this guide, we select nRF Connect SDK(NCS) v3.3.0.


Step 4: Before starting the download for (NCS)v3.3.0, confirm your preferred target installation pathway.
By default, it is configured to c:\ncs\v3.3.0. Press 'Enter' to confirm.


Step 5: Once the nRF Connect SDK v3.3.0 environment setup finishes successfully, open the Bluetooth sample folder and select the "peripheral_uart" application template, then click "Open".


Step 6: In the "nRF Connect" layout, go to "Applications" --> "Add build configuration".


Under "Board target", look up and select "nrf54l15dk/nrf54l15/cpuapp" --> "Generate and Build".


* Note: You can also choose the board name “raytac_an54lv_db_15/nrf54l15/cpuapp” for subsequent building and development.


After completing the configuration, you will see "Build complete".


Step 7: Compilation completed. Once completed, a binary file named "zephyr.hex" will be generated in your "build" directory.


Step 8: Under the "ACTIONS" interface, you can switch between Build, Debug, and Flash functionalities dynamically.

Build


Debug


Flash


Step 9: CRITICAL BEFORE FLASHING/DEBUGGING: You have to change the VDD voltage configuration on the nRF54L15-DK board to 3.3V.

To do this: Launch "nRF Connect for Desktop" -> choose "Board Configurator" -> click "Open"


Change the VDD target selection value to "3.3V" -> click "Write config".


4. Flashing / Programming
The nRF Connect SDK (NCS) natively supports direct programming.
You can utilize the "Programmer" application tool to flash the compiled zephyr.hex binary file onto the target chip.
The exact procedure is detailed below:

Step 1: Open "nRF Connect for Desktop" -> select "Programmer" and click "Open".


Click "Select Device" and choose "nRF54L15DK".


Click "Add file".


Step 2: Select your compiled target ".hex" file.


Click "Erase & write" to initiate the programming/flashing process.


While flashing, a progress diagonal pattern will display on the right-hand panel.


When the LOG shows a "completed" status text, it means that the programming/flashing is successfully done.


Step 3: After the flash operation completes, you can download the "nRF Connect for Mobile" app to scan and verify that the Raytac AN54LV-DB-15 development board is advertising normally.

"nRF Connect for Mobile" app download link: https://www.nordicsemi.com/Products/Development-tools/nRF-Connect-for-mobile


Useful References
nRF Connect SDK Documentation: https://developer.nordicsemi.com/nRF_Connect_SDK/doc/3.3.0/nrf/index.html

Nordic DevZone(technical support forum): Nordic Devzone for technical issue discussion


Edited by Account Manager: Christine Huang
Technical Guidance by R&D Manager: MW Lee

Raytac Corporation 勁達國際電子股份有限公司 / Raytac Corporation (USA) / abietec Inc.
A Bluetooth, Wi-Fi, and LoRa Module Maker/ODM & OEM Manufacturer based on
Nordic nRF54; nRF53: nRF52; nRF51; nRF7002
Infineon: CYW55912
NXP: RW610, RW612
Semtech: SX1262

Bluetooth Specification: BT6 ; BT5.4 ; BT5.3 ; BT5.2.
Wi-Fi Specification: Wi-Fi 6
LoRa Specification: LoRaWAN
Zephyr Project Silver Member

All products are FCC/IC/CE/Telec/KC/RCM/SRRC/NCC/WPC/RoHS/Reach Pre-Certified.

http://www.raytac.com
https://www.raytac.com/contact/
https://www.abietec.com/
email: sales@raytac.com
Tel: +886-2-3234-0208(TW)/+1-626-328-3827(USA)

Wednesday, January 14, 2026

New Distribution Partnership in European Region – Acal BFi

 [New Taipei City, Taiwan – January 12, 2026]

Raytac Corporation, a global leading supplier of Bluetooth, Wi-Fi, and wireless modules, announces a strategic partnership with Acal BFi(Website link) to strengthen wireless connectivity support for customers across Europe.
Through this collaboration, Raytac’s portfolio of pre-certified Bluetooth® Low Energy, Wi-Fi, and Wi-Fi + Bluetooth modules will be supported by Acal BFi’s local application engineering and design-in expertise.

Raytac specializes in short-range RF connectivity, delivering production-ready wireless modules optimized for low power consumption, RF robustness, and fast system integration.
Additionally, Raytac focuses on simplifying wireless design while ensuring stable performance across demanding industrial, medical, and IoT environments.

Raytac’s module portfolio includes ultra-low-power Bluetooth LE modules, Wi-Fi modules, and versatile Wi-Fi + Bluetooth combo solutions designed for reliable radio coexistence and long-term availability.
All Raytac modules are pre-certified to major global regulatory standards, including CE, FCC, IC, UKCA, TELEC, KC, RCM, SRRC, NCC, and WPC, enabling customers to significantly reduce certification time and compliance risk.

“Great ideas deserve great hardware,” said Lyon Liu, CEO, Raytac. “Our mission is to remove complexity from wireless design. Together with Acal BFi, we can now support customers not only with modules, but with the integration expertise to make sure those modules perform in the real world – in metal housings, in noisy RF environments, in medical devices, in smart sensors, wherever reliability matters.”

“Bluetooth and Wi-Fi connectivity is now a core requirement in almost every market we serve – from smart infrastructure and industrial automation to healthcare and sensing,” said Matthias Beuther, Business Development Manager, Acal BFi. “By partnering with Raytac, we are adding a powerful and proven wireless platform to our portfolio. The combination of Raytac’s module technology and our application engineering expertise gives our customers a faster, lower-risk path to market.”

By working closely with Acal BFi’s IoT & Wireless Technology Centre, customers gain access to local technical support covering antenna selection and tuning, power optimization, enclosure considerations, and coexistence validation. This partnership enables a more predictable, minimal-risk path from prototype to volume production for high-reliability wireless products deployed in real-world environments.


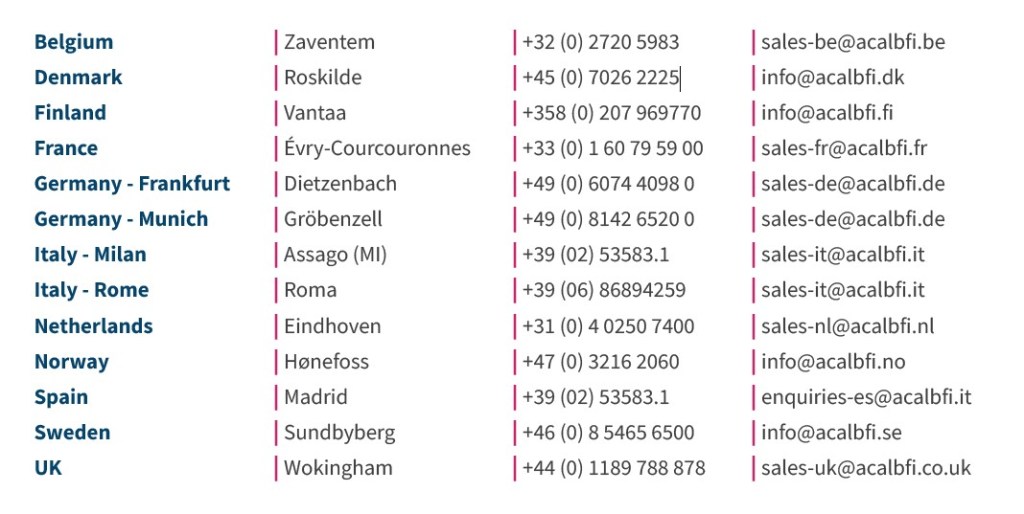
For inquires, please contact the below Acal BFi regional offices:


Friday, November 29, 2024

Overview of Raytac’s nRF54L15 module – AN54L series & Channel Sounding preview (Bluetooth 6.0)

 Table of Contents:

  1. nRF54L15 SoC feature brief
  2. Comparison among nRF54L15/ nRF5340/ nRF52840/ nRF52832 SoC modules
  3. Get started with nRF54L15 development (NCS 2.8.0)
  4. Channel Sounding preview

Next Level multi-protocol SOC -nRF54L Series

A. NEW generation nRF54L15 Soc Series

Key Features:
– ARM Cortex M33 + RISC-V co-processor 128Mhz in Nordic SoC
– Ultra compact Soc variant QFN/WLCSP, 22nm
– 2x the processing power, 3x the processing efficiency
– Industry-leading power consumption for battery-critical applications
– Global RTC wake-up from system-off
– Compatible with Raytac WIFI module -AN7002Q series
– High throughput 4MB proprietary radio mode
– Bluetooth Specification 6.0 / Support Channel sounding (Pending firmware)
– PSA(Platform Security Architecture) security level 3 qualified

Raytac nRF54L15 Module Series
– AN54LQ-15 (Regular) & AN54LV-15(Compact)


B. Comparison among nRF54L15/ nRF5340/ nRF52840/ nRF52832 SoC modules

If you are familiar with Nordic nRF52, nRF53 module series, you will have better idea to tell the difference heading to NRF54L series by referring to the chart as below.


C. Get started with nRF54L15 development (NCS 2.8.0)

nRF54L15 SoC Spec  << access linkc
Nordic nRF54L15 DK  << access link
Raytac AN54LQ-DB-15   << access link

Photo of Nordic nRF54L15 DK


Preparation of Hardware:
1. 1x Nordic NRF54L15 DK (PCA10156-0.9.1)
(Note: If you have PDK (PCA10156-0.8.1) on hand, it can be done in trial phase)
2. 1x Raytac AN54LQ-DB-15
3. 1x IDC Ribbon wire
4. 2x USB-C connector wires (for powering the kit up)

Note: Using Nordic nRF54L15DK / nRF54L15PDK as debugging tool and Raytac Demo board-AN54LQ-DB-15 as simulated carrier board(main board) to proceed the program of nRF54L15 for code compiling and development.

Tips: Please align the red edge of Ribbon at side of 1 in connector J1.


Step 1 —- Connected NRF54L15 DK and AN54LQ-DB-15 by IDC Ribbon wire
Step 2 —- Powering on both NRF54L15 DK and AN54LQ-DB-15 by USB-C connector


<<  Schematic of AN54LQ-DB-15  >> (Updated on 21-Jan-2025)
(Click on the picture to zoom in)


Software Kits Resource & Preparation
Download nRF Connect For Desktop (Please Click Me)
Download nRF Command Line Tools (Please Click Me)


Preparation
1. Prepared with the latest version of nRF Connect for Desktop and Select version Windows 64-bit – 5.1.0
2. Prepared with the latest version of nRF Command Line Tools and Select version Windows x86 64-10.24.2
**Note: SEGGER J-LINK Upgrade message might pop up while you’re doing above download.

 If you’re initiating Segger Embedded Studio (SES) application, please check the guideline here(Click me) 

3. Locate all the necessary kits for programming in PC (Check Software/Application list)


Get started with building your program

Intro: The development tool of nRF Connect SDK(NCS) equipped with free VS (Visual Studio) Code IDE for firmware compile and programming.
Note: it is highly recommended to apply NCS 2.8.0 for advanced features of nRF54L15.

Step 1 —- Activate your “nRF Connect for Desktop”  >> “Toolchain Manager” >> “Open” >> “Install”


Step 2 —- You will find multiple options of NCS V x.x.x in the tool, we’re using NCS v2.8.0 as example to run sample code of nRF54L15.


Step 3 —- Make sure the NCS v2.8.0 is installed at same directory with compiling system. (the root of Open VS Code) (This is using C:\ncs  as example.)


In case to organize the files, do “Select directory’” and “Confirm”.


Step 4 —- After nRF Connect SDK v2.8.0 Download ready , go “Open VS Code”.


Step 5 —- Go “Open Existing Application” , and activate example code: Bluetooth > peripheral_uart


Step 6 —- Moving to program build & compiling by selecting dev kit: nrf54l15dk/nrf54l15/cpuapp


Step 7 —- You will get a .hex file after the above programming compiling process.


Step 8 —- Functions are available for during the code compiling process under “ACTIONS” in VS Code IDE
<< Build >>


<< Debug >>


<< Flash >>


Firmware Programming
It is feasible to do the firmware programming using nRFConnect SDK (NCS) tool.
Developer may use “Programmer” to do the firmware flashing with the candidate .hex file.

Step 1 —- Execute nRF Connect for Desktop >> Programmer >> Open


 “Select Device”


Select ”nRF54L15 DK


“Add File”


Step 2 —- Select the candidate .hex file

Select “Erase & Write”


It indicates the programming process is on the way↓


The firmware programming process is done after seeing “Completed” in system Log field.


Step 3 —- Use the mobile App to make sure the Bluetooth broadcasting is functioning after the firmware flashing process is successfully done to the module.


D. Channel Sounding Preview

What is Channel Sounding? —- Advance the “Find My” feature into next level accuracy
Have you ever concerned about the distance accuracy when you’re using RSSI to get the distance between devices and to evaluate the transmission distance with legacy Bluetooth module?
Nordic NRF54 solution has taken us into next level with Channel Sounding feature that achieves the “centimeter-level” distance accuracy. Early implement achieves 10-20cm in the record.

Credit: Bluetooth Alliance


How does Bluetooth Channel Sounding work?
Bluetooth Channel Sounding implemented with 
Phased-Based Ranging (PBR) & Round-trip time (RTT) (the concept idea of TOF time of flight) algorithm to achieve a higher precision of measuring distance between 2 devices.

Phased-Based Ranging (PBR):
Signal has been sent between initiator and reflector with multiple frequency to increase measuring accuracy.

Credit: Bluetooth Alliance


Round-trip time (RTT): It’s the concept of utilizing TOA (Time of arrival). Using TOD(Time of departure) & TOA to measure the timing during the packet transmission between devices.

Credit: Bluetooth Alliance


Potential applications:
Personal item finding
Secure access control
Smart lock system
Digital Key
Asset Tracking


Reference:
Bluetooth Channel Sounding
nRF54L15 DK hardware
nRF Connect SDK Documentation
Nordic Dev Zone forum
AN54LQ-15 Module series


Edited by Business Development Manager: Ms. Jocelyn Tsai
Technical guidance provided by R&D Manager: Mr. MW Lee & Mr. Stanley Huang


Raytac Corporation 勁達國際電子股份有限公司
A Bluetooth, Wi-Fi, and LoRa Module Maker based on
Nordic nRF54; nRF53: nRF52; nRF51; nRF7002
Semtech Specification: SX1262


Bluetooth Specification: BT6 ; BT5.4 ; BT5.3 ; BT5.2.
Wi-Fi Specification: Wi-Fi 6
LoRa Specification: LoRaWAN


All products are FCC/IC/CE/Telec/KC/RCM/SRRC/NCC/WPC Pre-Certified.
http://www.raytac.com
email: sales@raytac.com
Tel: +886-2-3234-0208